Wondrous Wreath Bokeh Effect ~ Stampin' Up! Artisan Blog Hop

Welcome to the final Artisan Blog Hop for 2014 and hello hello if you've clicked through from our December Facebook showcase. Just so you know, next week the Artisan team takes a break for Christmas. I'm hoping it's a fine day so my family and I can toddle off to the beach!

The bokeh effect has definitely been a huge cardmaking trend this year. If you haven't heard of it, it's defined as... wait, where have you been?! ... Ok bokeh is a Japanese word meaning 'blur' which, in photography, is used to describe the areas of the photo that have soft focus.

Here's a way to do a bokeh effect oh-so-simply with the Wondrous Wreath stamp set. Smudge a few drops of Pool Party and Island Indigo reinkers with your aqua painter on some watercolour paper. When it's mostly dry, stamp the berries from Wondrous Wreath with white craft ink. Stamp several times before re-inking. There you go!

If you try this at home, I'd love to see your creation - please do post me a pic on my Facebook page: https://www.facebook.com/stampingsusanwong

Easy bokeh effect with the Wondrous Wreath berries ~ Susan Wong


Supplies:
Inks: Pool Party & Island Indigo reinkers, Whisper White Craft Stampin' Pad, Tuxedo Black Momento Ink Pad
Papers: Whisper White, Island Indigo, Watercolour Paper, Smoky Slate
Stamps: Wondrous Wreath
Accessories/Tools: Gold Baker's Twine, Linen Thread, All is Calm Snowflake Embellishment


And that's a wrap! Wishing you a very MERRY CHRISTMAS with the ones you love. It's a meaningful time of year for us but if you don't celebrate Christmas, I hope at least you get a holiday out of it ;)

If I don't manage any posts between now and January 1st, come back then for our first Artisan Blog Hop of 2015. We'll bring you loads of exciting new project ideas with products from the Occasions Catalogue!! YAY!

I bet Teneale has a stunner for us this week - go check it out!

Hello December Christmas Card with a Twist ~ Stampin' Up! Artisan Blog Hop

At what age is it that you get to pick an age to stay at every year henceforth? Well, I don't know if my husband is quite THAT old yet but it never hurts to be 25... again. We're celebrating his birthday today. He says when I blog this I can say it has his nod of approval for a great masculine card.

Do you have December birthdays in your family? It's fun to think outside the box (literally, I guess, since that's what all my Artisan goodies arrive in) and use a Christmas set for something else. Here you go---

Hello December as a Masculine Christmas AND Birthday Card (detail) ~ Susan Wong

Hello December as a Masculine Christmas AND Birthday Card ~ Susan Wong


Supplies:
Inks: Cherry Cobbler, Early Espresso, Smoky Slate
Papers: Hello December Project Life Accessory Pack, Early Espresso, Smoky Slate, Whisper White
Stamps: Project Life December Wonder, Alphabet Rotary Stamp
Accessories/Tools: Linen Thread, Accessory Pack (as above), Dazzling Details Silver Sparkle, Wisteria Wonder Blendabilities (light), All is Calm Designer Washi Tape

Teneale loves these little one-liners introducing her blog - speaking of her blog - go on, check it out!

Toilet Roll Nativity ~ One for the Kids

This is a Pinterest-inspired project I did with my four year old daughter - lover of all things crafty. My husband insisted I blog it!  

You really can make ALL sorts with these little tubes and whatever you can find around the house. Just the other day my sister posted a pic of a cute Christmas angel. We used a cut out from an egg carton pushed through the tube to shape each head. Twine, stapler, glue, sticky tape and 1 3/8" circle punch all came in handy. The Trim the Tree Designer Paper Stack was the perfect size for the robes. Anyway, here you go...


 They got the gold right. Not sure about the frankincense and myrrh...


Wondrous Wreath Gift Tag ~ Stampin' Up! Artisan Blog Hop

I didn't expect to fall completely in love with the Wondrous Wreath set!! It really is so gorgeous that it speaks for itself - so here you go...

Wondrous Wreath Gift Tag ~ Susan Wong

Wondrous Wreath Gift Tag ~ Susan Wong

This, my friends, is a reusable tag. I wanted something that could easily be stuck on the next present so I just popped one dimensional on under where the staple holds the bow and glimmer paper in place. 

Never used this set before? Have a look and see that all the stamps and coordinating framelits have a tab at the same point in the wreath to help you line things up.

ARGH - Is it really December and so close to Christmas?!?! Have you started wrapping presents?

Supplies:
Inks: Smoky Slate, Basic Grey, Real Red, Old Olive
Papers: Whisper White, Dazzling Diamonds Glimmer Paper
Stamps: Wondrous Wreath, And Many More
Accessories/Tools: Wonderful Wreath Framelits Dies, Handheld Stapler, Cherry Cobbler Baker's Twine

What will Teneale surprise us with this week? Click below...

Gratitude For Days Birthday Cake Banner ~ Stampin' Up! Artisan Blog Hop

Bit of a personal post this week and a bit of a 'homemade' job on the banner (by which I mean terribly uneven hand-drawn lettering)! But, I hope you'll appreciate the idea anyway because this Gratitude for Days set has some great little images in it which - I might add - stamp beautifully on our Canvas Creations.

So, here you go - my daughter's 4th birthday cake. Basically a GIANT blueberry muffin! I'm not big on making fancy cakes (too hard basket) but always try to make them delicious. This is my favourite oh-so-adaptable muffin recipe made in cake form and layered with cream cheese icing in the middle. Ok ok - enough about the cake. Nom nom.

Gratitude for Days Birthday Cake Banner ~ Susan Wong

Gratitude for Days Birthday Cake Banner ~ Susan Wong

Supplies Used:
Inks: Real Red, Strawberry Slush, Tangelo Twist, Calypso Coral, Hello Honey
Papers: Hello Honey, Coastal Cabana, Strawberry Slush, Tangelo Twist
Stamps: Gratitude for Days (Holiday Catalogue)
Accessories/Tools: Canvas Creations, Basic Black Baker's Twine, Gift Card Envelope & Trims Thinlits Dies, Handheld Stapler, Project Life Journaling Pens

Bamboo skewers


Let's check out what Teneale has to wow us with this week...

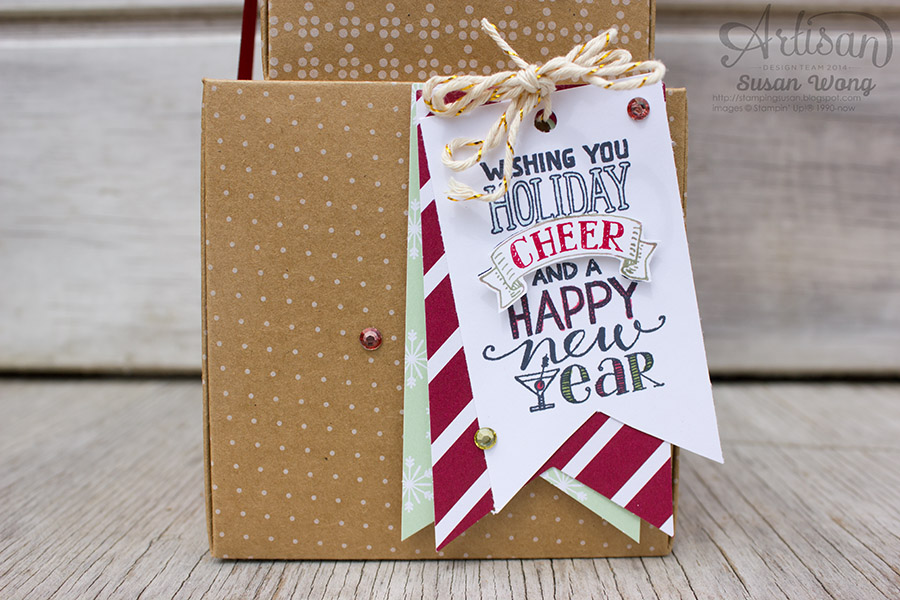
Box Tree ~ Stampin' Up! Artisan Blog Hop

What Christmas decor do you put up around your home? Well, here's a little idea! It's a mini Christmas tree made from boxes. Fill it up and use it as an actual gift or pop it on display in your office space or around the home. Welcome if you've come through from our November showcase on Facebook :)

Stack some boxes to make a 'tree' ~ Susan Wong

The Gift Box Punch Board makes this project a breeze. I used the guide on the board itself to do one of each cube size - 4x4x4", 3.25x3.25x3.25", 2.5x2.5x2.5" and 1.75x1.75x1.75". 

Sheer Linen Ribbon Double Bow ~ Susan Wong

Sheer Linen Ribbon is really great to work with and holds shape beautifully. I used an extra long piece and simply tied two bows on top one after the other. I'm not usually that good at fancy bows so that says a lot for this ribbon!

Kraft Roll Wrapping Paper 'Lucky Star' ~ Susan Wong

'You must be my lucky star...' - I used a 1" wide strip of our Festive Designer Kraft Paper Rolls to make this Japanese Lucky Star (see, I did learn something at school way back when). 

Under the Tree Tag a Bag on a Box ~ Susan Wong

And YUP! It's the Under the Tree Tag a Bag kit again! Getting good milage out of that one.

Supplies:
Inks: Pool Party, Real Red & Wild Wasabi Markers. Jet Black Stazon. Cherry Cobbler & Old Olive Blendabilites.
Papers: Under the Tree Specialty Designers Series Paper, Festive Designer Kraft Paper Rolls, Under the Tree Tag a Bag Accessory Kit, Tea Lace Paper Doilies, Whisper White
Stamps: Mingle All the Way
Accessories/Tools: Cherry Cobbler Sheer Linen Ribbon, Basic Black & Cherry Cobbler Baker's Twine, Gold Metallic Baker's Twine, Gold Sequin Trim. Rhinestone Basic Jewels.

Time to hop to Teneale's blog and check out her amazing creation!

Bow Time ~ Stampin' Up! Artisan Blog Hop

If you like it then you gotta put a bow on it.. oh oh oh, oh oh oh oh oh oh. Before we get any deeper into this terrible excuse for a Beyonce cover, here's how I made this super easy bow with the Gift Bow die...

Gift Bow on a Takeout Box detail ~ Susan Wong

I used nine cut outs (I was even a bit cheeky and rolled them through ALL at once). The bottom layer of the finished bow has five 'petals' and the top layer four. They're cute all facing the same direction to look like a fan too!

1) Pull some linen thread onto a needle until both ends meet then tie the ends in a knot twice in the same spot.
2) Poke your needle through each end of the cutouts. Make sure the side of the designer paper you want to see is facing you when you first poke.
3) Thread on all your cutouts.
4) Roughly put them in the orientation you want then cut the string to let the needle off, thread a button on and tie tightly. 
5) Use some sticky strip to secure it to your package. This holds each 'petal' in place pretty well.

Gift Bow How To ~ Susan Wong

Did you know our uber-cool takeout boxes are food safe? Maybe you could fill them with Chocolate Peppermint Bliss Balls! (SEE RECIPE BELOW) You know I will be.

Gift Bow on a Takeout Box ~ Susan Wong

Supplies for Box:
Inks: Whisper White Craft, Cherry Cobbler
Papers: Takeout Boxes, Tea Lace Paper Doilies, Trim the Tree Designer Series Paper Stack, Gold Foil Sheets
Stamps: Cheerful Tags (Holiday Catalogue)
Accessories/Tools: Cherry Cobbler Sheer Linen Ribbon (love this stuff!!), Linen Thread, Gold Basic Metal Buttons, Gift Bow Bigz L die


Chocolate Peppermint Bliss Balls
By Tanya Howie
(Tanya is a passionate and healthy foodie friend of mine. Check out her Delicious & Nutritious board on Pinterest and if you're an Auckland local, she's contributing in the Backyard Grocer hampers - great for Christmas.)

1/2 cup almonds
1/2 cup cashews
1/2 cup oats
1/2 cup desiccated coconut (plus extra for coating)
1 firmly packed cup dates (soaked in hot water for 15 mins, or use medjool dates)
1/4 cup cocoa or raw cacao powder
1/2 tsp peppermint essence (or more to taste)
Pinch of sea salt

Soak dates in hot water for 15 mins, then save the water in case your mixture is a bit dry.
Blend first four ingredients in your food processor until it's a fine crumb.
Add in dates (not water), cocoa, peppermint and sea salt. 
Blend again until well mixed. If mixture is too dry, add in 1 tbsp of date water at a time, until you can roll it into balls easily.
Roll mixture into balls & roll in coconut.
Put into fridge to set for at least 30 mins. Store in fridge.

Let me know in the comments if you make these and what you think! Nom nom. 


Time to check out Teneale's creation this week...


Be Merry Christmas Card ~ Stampin' Up! Artisan Blog Hop

I'm sure that November is always busier than December these days as everyone (me) tries to cram things in before Christmas. So... just a quick post this week!

Here's a fun Christmas card made with the Under the Tree Tag A Bag Accessory Kit. And just to let you in on a bit of the process - this project morphed quite a bit as it was being made. It started as a mini banner! All part of the fun.

Tag A Bag kit on a Card. Eat, Drink & Be Merry! ~ Susan Wong

Tag A Bag kit on a Card. Eat, Drink & Be Merry! (inside) ~ Susan Wong

Supplies:
Inks: Early Espresso, Cherry Cobbler
Papers: Whisper White, Pistachio Pudding, Under the Tree Tag a Bag Accessory Kit, Silver Glimmer Paper
Stamps: Holiday Invitation (Holiday Catalogue), Gratitude For Days (Holiday Catalogue)
Accessories/Tools: Basic Black Baker's Twine, Cherry Cobbler Baker's Twine, Cherry Cobbler Sheer Linen Ribbon (cut in half and used as a mat for the sentiment), On Point Textured Impressions Embossing Folder

I wonder what crafty goodness Teneale has for us this week... click below!

Frame Me Till Christmas ~ Stampin' Up! Artisan Blog Hop

Here's a frame-able 12x12 page I made for display in my home with the Seasonal Snapshot Project Life cards. Pattern overlooooaad! You can never have too much colour right?

I feel it's a little early so it won't be put out quite yet! BUT the best part is, I'll easily be able to add some photos and pop it in the album after the festive season. Christmas is in the Summertime here in New Zealand and where I live we're not more than 40mins from loads of different beaches. Naturally, some of my favourite family snaps year-by-year are over this time. 


Seasonal Snapshot Holiday 12x12 Decor ~ Susan Wong


Seasonal Snapshot Holiday 12x12 Decor detail ~ Susan Wong


Seasonal Snapshot Holiday 12x12 Decor detail ~ Susan Wong


Seasonal Snapshot Holiday 12x12 Decor ~ Susan Wong

Supplies:
Inks: Real Red Marker
Papers: Seasonal Snapshot Project Life Card Collection, Tea Lace Paper Doilies, Whisper White (for backing) and Sahara Sand 12x12, Fancy Foil Designer Vellum, Gold Foil Sheets, Old Olive, Real Red.
Stamps: Remember Rotary Stamp
Accessories/Tools: Seasonal Snapshot Project LIfe Accessory Pack, Linen Thread, Gold Metallic Baker's Twine, Dimensionals


Go check out what the talented Teneale has been up to!

For All Things - Hello You!! ~ Stampin' Up! Artisan Blog Hop

I had a particular person in mind as soon as I saw this stamp set in my October box and, my, how convenient, her birthday is in October too! This card is on its merry way to Tanzania where my wonderful sister lives with her family. If I'd had my act together a bit better she may have actually received this before this week's post went live......... oops.

LOVE the yellow polka dot background. That's a 3x4" Project Life card!

For All Things 'Hello You' card detail ~ Susan Wong


For All Things 'Hello You' card ~ Susan Wong

Supplies Used:
Inks: Blackberry Bliss, Cajun Craze, Pool Party, Crushed Curry, Black Stazon
Papers: Kraft Cardstock, Smoky Slate, Seasonal Snapshot Project Life Card Collection, Silver Glimmer Paper, Whisper White
Stamps: For All Things (Holiday Catalogue), And Many More (seriously, I seem to use this every week!)
Accessories/Tools: 1 3/8" Circle Punch, Decorative Label Punch, Linen Thread, Venetian Crochet Trim

Time to hop on over to Teneale's blog...

Love You! with Seasonally Scattered ~ Stampin Up! Artisan Blog Hop

Seasonally scattered is a set I wish I had more time to play with! It'll definitely be popping up in my Project Life pages - or other layouts. But for now, here's the 'love' stamp on a card for you.

Welcome if you've clicked through from the Stampin Up! October Artisan showcase on Facebook. Hope you have fun and get inspired as you hop through the blogs. This is a seriously talented bunch of ladies! Pssst ~ have you seen our collective board on Pinterest? Click here!

Seasonally Scattered 'Love You' card detail ~ Susan Wong

Seasonally Scattered 'Love You' card ~ Susan Wong

Supplies:
Inks: Tangelo Twist, Strawberry Slush, VersaMark
Paper: Strawberry Slush, Coastal Cabana, Tea Lace Paper Doilies, White Vellum, Crushed Curry, Tangelo Twist, Whisper White
Stamps: 135023 Seasonally Scattered, 134275 And Many More, 134198 Choose Happiness
Accessories/Tools: Gold Stampin' Emboss Powder, Linen Thread, Gold Basic Metal Buttons


Hop along to the lovely Teneale next...


Thankful Concertina ~ Stampin' Up! Artisan Blog Hop

Early last year, I helped make invites en masse for my friends' wedding. It occurred to me when rustling through the Project Life cards in our box this month that they're the perfect size for this little concertina purse made from Stampin' Up! C6 envelopes. Below is the original design we made. They were sealed and posted just like that.

Concertina Wedding Invitation ~ Susan Wong
Jo Currie Photography
And here's my new take on it. (School holidays - my son is the hand model this week.)

I'm Thankful For Concertina cover ~ Susan Wong

I'm Thankful For Concertina cover detail ~ Susan Wong

I'm Thankful For Concertina closure ~ Susan Wong

I'm Thankful For Concertina inside ~ Susan Wong

Want to make your own?

For the concertina:
Seal (licky licky) then slice a couple of millimetres off both ends of two envelopes.
Fold them in half and lay flat with all open ends at the top.
Stick them together with a thin line of glue between each layer.
Place Project Life Seasonal Snapshot cards in each pocket. I've done one each but you could fit more and add other embellishments if you choose.

For the cover:
Cut a piece 25.5 x 11.7cm.
Where the card bends we score 4 lines very close together to give it a wider bend without having to add a spine. Here are the measurements I used:
Score at 8, 8.1, 8.2, 8.3, 8.4 & 16.4, 16.5, 16.6, 16.7cm.
Now is the time to thread your buttons on if you want a button closure.
Shape cover around your concertina envelopes and adhere with the same thin strip of glue in the centre.
Time to decorate :)

Supplies Used:
Ink: Tuxedo Black Momento Ink, Strawberry Slush, Calypso Coral, Crushed Curry
Paper: Kraft Cardstock, Very Vanilla C6 Envelopes, Basic Black, Seasonal Snapshot Project Life Card Collection (Holiday Catalogue), Fancy Foil Designer Vellum, Calypso Coral, Crushed Curry, Watercolour Paper
Stamps: 135170 I'm Thankful For, little heart from 135095 Holiday Home
Accessories/Tools: 133763Gold Basic Metal Buttons, Gold Sequin Trim, Venetian Crochet Trim, Linen Thread


Teneale's up next. Go check it out :)


Embossed Storage Jars ~ Stampin' Up! Artisan Blog Hop

It's school holidays here in New Zealand before we head into term four and the final countdown until Christmas and our long Summer break. So my project this week is kid-focussed, because that's where we're at right now. Lots of crafts and spontaneous outings and lots of jobs getting done that don't seem to fit into the normal school week routine (I tidied my linen cupboard!).

Organised colouring pencils not only get heaps more use but are much nicer on the eye than the overloaded box we had going on. Here we go...

White & Gold 'Dipped' Storage Jars Tutorial ~ Susan Wong

White & Gold 'Dipped' Storage Jar ~ Susan Wong

Omit the washi tape if you don't want a specific edge pattern. I found the versamark had a clean enough edge on its own. 

Supplies:
Inks: Versamark, Markers in various colours
Papers: Whisper White
Accessories/Tools: 135860 Note Tag Punch (Holiday Catalogue), 133763 Gold Basic Metal Buttons (Holiday Catalogue), Linen Thread
Empty jam/relish jars with labels soaked off.

Hop across to the talented Teneale next.